Browsers Inconsistency and Implementation Bugs
We all know that web browsers have inconsistencies, and that’s fine. As web developers, we have to fix those on day one of a project, so that we can start with a clean and solid code base. In this chapter, I will go over the most common CSS resets, along with how to make reduced test cases and do regression testing.
Using a CSS Reset File
CSS reset files are an important part of web development. The two most common are Reset CSS by Eric Meyer and Normalize.css by Nicolas Gallagher.
By using a CSS reset file, you will save yourself a lot of time fixing and debugging issues that have already been fixed. Take the following example from Normalize.css:
/**
  * 1. Correct the line height in all browsers.
*/
html {
  line-height: 1.55; /* 1 */
}
Having a consistent line-height across all browsers is important. It will save you time from figuring out why the line-height does not work consistently across browsers.
Another example is making elements such as b and strong have a bold font weight. This doesn’t work consistently in all browsers, so adding it will prevent unexpected behavior.
/**
  * Add the correct font-weight in Chrome, Edge, and Safari.
*/
b,
strong {
  font-weight: bold;
}
These are only a couple of examples. Remember to include a CSS reset file. If you don’t want to, then at least work on your own reset file. Some will argue that a reset file is not always needed because it will increase the total size of your CSS files. I agree. But you can easily create your own small file and be done with it.
Using Normalize.css
Compared to some other resets, Normalize.css only fixes issues with browser consistency, without resetting everything. It will keep common CSS styles among web browsers. For example, the margins of heading elements such as h1 and h2 will be preserved.
Here is a snippet from Normalize.css that resets the body element’s margin:
body {
  margin: 0;
}
Depending on the nature of the project you’re working on, you can decide what’s best to use.
Browser Implementation Bugs
Web browsers are made by humans, and humans make errors. It’s totally normal to find that a browser does not support a particular feature as expected or implements a feature differently than other browsers. In this section, we’ll walk through the steps of finding a bug in browser implementation.
First, what is a browser implementation bug? It’s a bug caused by the browser itself. The bug might be in one or multiple browsers and is caused by improper implementation of the CSS specification.
Verify the Bug
Is there really a bug, or are you mistaken? It’s a waste of time to start debugging something, only to realize later that it’s not a bug, but rather a deliberate feature.
Some bugs are ones that appear in all browsers on all devices — those are easy to find. Other bugs appear in specific browsers or devices, like the Nexus 5 Android phone — finding those are harder because you would need an actual Nexus 5 device or an online emulator, which is usually not free.
Verifying that a bug is indeed a bug will vary according to its complexity. Once you are sure that it’s a bug, then you’ll move on to the next step.
Decide on the Correct Behavior
Once you’ve verified that it’s a bug, you’ll need to decide how the feature ought to look and behave. For example, you could decide that a particular element’s height should be between 150 and 450 pixels, and if it surpasses that, then it will be considered a bug.
Isolate the Bug
Once you’ve verified the bug and decided on the correct behavior, try to reproduce it. Let’s learn how to reproduce a bug through test-case reduction.
Test-Case Reduction
One of the most underrated skills among web developers is creating a reduced test case. When we encounter a problem with a web page we’re building, we need to identify the cause. The problem might be across browsers or only on mobile browsers. Debugging an issue by working with a page’s entire HTML and CSS is not ideal. We need to isolate the problem in a test case, so that our time is spent more on fixing the problem than on identifying it.
Let’s learn how to make a reduced test case.
- Disable JavaScript
If you disable JavaScript and the problem is still there, then you’ll know the problem has nothing to do with JavaScript. This is helpful for quickly ruling out JavaScript-related issues. Adding on that, you can open the project in a private mode tab, or deactivate all the browser extensions. If the issue disappears, then it might be because a browser extension.
- Identify the problem
Is the problem related to alignment? Or horizontal flow? Whatever it is, we need to identify it. It helps to articulate the problem very precisely: “I’m going to debug the horizontal scrolling in the hero section. ”
- Isolate the HTML
Open up the browser’s DevTools and comb through the head element of the page, eliminating any unneeded style and script files. If something looks unrelated, remove it and move on. Once the head is cleaned up, move on to the body element and remove all HTML that is not related to the problem.
- Isolate the CSS
Now that we’re sure the HTML contains only the bit of code we want to debug, let’s isolate the CSS needed for that HTML. Remove any decorative styles, like color and background-color. Keep the CSS as minimal as possible, leaving only the CSS that is causing the problem.
- Comment the code
If you doubt that a particular HTML element or CSS rule is causing the issue, add a comment explaining as much, so that you don’t forget while debugging. Comments are extremely useful when you need to get help from others or as a reminder if you come back to the issue after some time.
- Use the reduced files
Once we’re done isolating the problem, let’s copy the remaining HTML and CSS to a new local file, and then we’ll be ready. We now have a reduced test case of the problem. Better yet, we can add the HTML and CSS to CodePen , which will make it easy to test it ourselves or to get help from others.
Example of Reduced Test Case
To make things clearer, let’s go through a real example of a CSS bug and see how to convert it into a reduced test case.
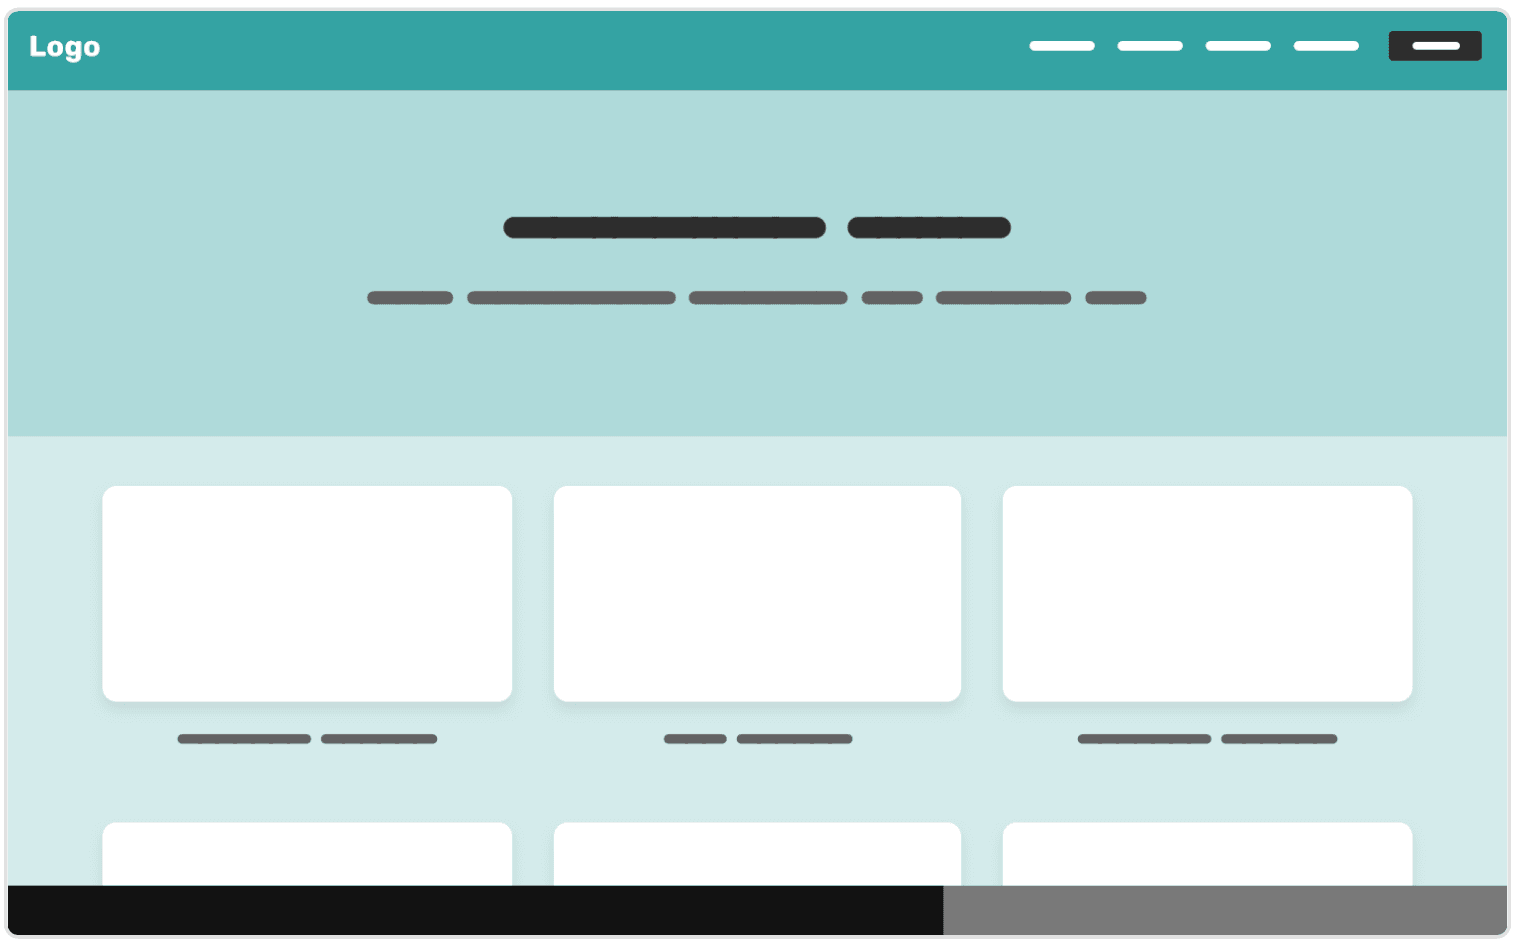
In the figure below, we have a web page with a horizontal scrolling issue. We’ve tried hard and can’t figure out how to solve the problem. So, let’s isolate the problem as much as we can.
At first, we’ll try the following:
-
Remove any additional styles and scripts from the page’s
headelement that are not important to the demo. -
Inspect the
bodyelement, and delete the sections one by one. If deleting a section causes the issue to disappear, then keep it. -
Once we’ve decided on the HTML that should be kept, the next step is the CSS. We need only the CSS required to make the demo work, such as
width,height, anddisplay. Decorative properties such asbackground,border,color, andbox-shadowcan be removed if they don’t affect the issue.
Following the steps above, we should have the least amount of HTML and CSS to make the test case work. Repeat the steps above, and make sure that the code is clean. Here is how our reduced test case looks after we’ve isolated it:

It looks like the issue is in the grid section. Now, the question is, is it possible to reduce this even more? Here is what we can do:
- Remove the second row in the grid.
- Clean up the rounded corners and the shadow of the cards.
- Remove the title from each card.

Once it’s cleaned, we can add some comments to aid with testing.
/* Not sure if 100vw is causing the horizontal scrolling. */
.section {
  width: 100vw;
  padding: 1rem;
}
This comment makes it helpful for us or anyone else who tries to fix the bug. This is the most we can do to reduce the test case. The next step is to extract the HTML and CSS, and upload them to our website or wherever we want.
Make It Fail
In his book on debugging, Dave Agans identifies “make it fail” as one of the primary steps in debugging any coding problem. The extent to which we can follow this advice with CSS will depend on the type of bug we’re dealing with. Some bugs are clear — for example, ones that appear in all viewport sizes. Other bug types are more complex, in which case making them fail is harder.
As Agans mentions in his book, the reasons for making it fail are so that:
- we can look at the bug,
- we can focus on the cause,
- we can tell if we’ve fixed it.
A line of his illustrates a misconception we often run into:
The toast burns only if you put bread in the toaster; therefore the problem is with the bread.
Sometimes, we misunderstand the cause of a CSS issue. The toast only burns if we put it in the toaster for a long time. If it burns, then it’s our fault, not the toaster’s. This same goes for CSS development. If we use a layout module to do something it wasn’t designed for, then the fault is ours.
You might wonder, “What if I’ve tried everything I know of and still can’t reproduce the issue?” Well, remind yourself that every failure has a cause. There is no secret recipe for finding it; it’s hidden somewhere in the randomness.
Back Up Your Work
Before testing, save your work in a new Git branch. If you don’t use version control, copy your work in a backup, and start testing from there. By doing one of these, iterating and changing things will be much safer, and the chances of losing work will be very low.
Document Everything
For a complex CSS bug, I like to write down the following:
- what I did,
- the order of steps I took,
- what happened as a result of the steps taken.
Documenting these steps can be helpful for you and your team.
The following is an example of documented steps to reproducing a CSS bug.
- Open the website in Safari on iOS 12.
- Click on the mobile menu toggle.
- Click on the close button. It doesn’t work.
- Click on the close button again. It works.
When doing the steps above, the page should be blank, except for the header, where the problem is.
Test and Iterate
Once we have a reduced test case, we can start testing the bug in the browser or device in question. We would keep iterating and editing until we notice a difference.
When iterating, it’s very important to change one thing at a time. Don’t change the CSS randomly and hope that it will work. If it works, then you won’t know how you did it, and the guesswork will start. Change one thing, test, and repeat.
The usefulness of this approach is that, when the bug is fixed, we can compare the changes we made to make it work. This wouldn’t happen if we changed a million things at once to get it working.
Research the Issue
If you’ve tried hard to fix the issue and can’t do it, then the internet is your friend. Search online for the issue or pattern, and see whether others have faced the same issue. Chances are high that you are not the first.
Report to Browser Vendors
If you believe that the bug you’ve found is unique and no one has ever encountered it, then it’s time to report it to browser vendors. Every browser vendor has a public forum with all of the bugs submitted by users. If you’ve documented the steps taken to reproduce the issue, as recommended earlier, then all you need is to post the steps with your reduced test case files. Also, submit a screenshot or video if that would help.
Here is where to submit bugs in browser implementation:
- Firefox: bugzilla.mozilla.org
- Safari: bugs.webkit.org
- Chrome: bugs.chromium.org
Never Throw Away a Debugging Demo
When working on a reduced test case, you might create multiple copies of it, each with a slight change. Don’t delete them. Archive them, because they might be helpful in the future. You could do a few things with them:
- Write a blog post about the bug and your test cases, explaining how you fixed it.
- Keep them as a log for yourself, for when you face a similar bug.
- Share them with a colleague or team members who want to learn how you fixed it.
Regression Testing
As explained on Wikipedia :
Regression testing is re-running functional and non-functional tests to ensure that previously developed and tested software still performs after a change. If not, that would be called a regression.
When you fix a bug, you might accidentally break another thing without knowing it. That is called a regression. Testing for regressions can be time-consuming, because a bug might occur in a particular environment, viewport size, or scroll position. Using a tool, we can do regression testing by defining our design components.
In this section, we will learn how to use BackstopJS to do regression testing. According to the official GitHub repository :
BackstopJS automates visual regression testing of your responsive web UI by comparing DOM screenshots over time.
BackstopJS uses a headless Chromium browser, the same one used for Google’s Chrome. Here is how it works:
- Assign a URL path for the page we want to test.
- Add the selectors we want to watch.
- Generate reference screenshots for them.
- Run
backstop testto test our changes against the reference screenshots.
Let’s learn how to use BackstopJS. First, install it globally:
$ npm install -g backstopjsInside our project’s directory, we need to initialize a BackstopJS project.
$ backstop initBackstopJS Configuration File
When we initialize the project, a backstop.json file will be created in the root directory of the project. You will find everything that can be configured in there. For our simple lesson, the following are required:
idviewportscenarios
In the scenarios array, there is a selectors array, where we can add all of the CSS selectors to watch. I’ve added the following:
"viewports": [
  {
  "label": "phone",
  "width": 320,
  "height": 480
  },
  {
  "label": "tablet",
  "width": 1024,
  "height": 768
  }
],
"scenarios": [
  {
    "url": "http://localhost:8080/",
    "selectors": [
      ".c-header--full"
    ]
  }
]
In this configuration, we’ve added two elements to watch, and the URL of the page is index.html. The next step is to generate the reference screenshots.
$ backstop referenceBy generating a reference for the elements we’ve assigned, we can make changes in the CSS. If something is different from the reference, BackstopJS will throw an error, with a detailed UI.
To use the tool, let’s increase the vertical padding in the header, and then rerun the test.
$ backstop test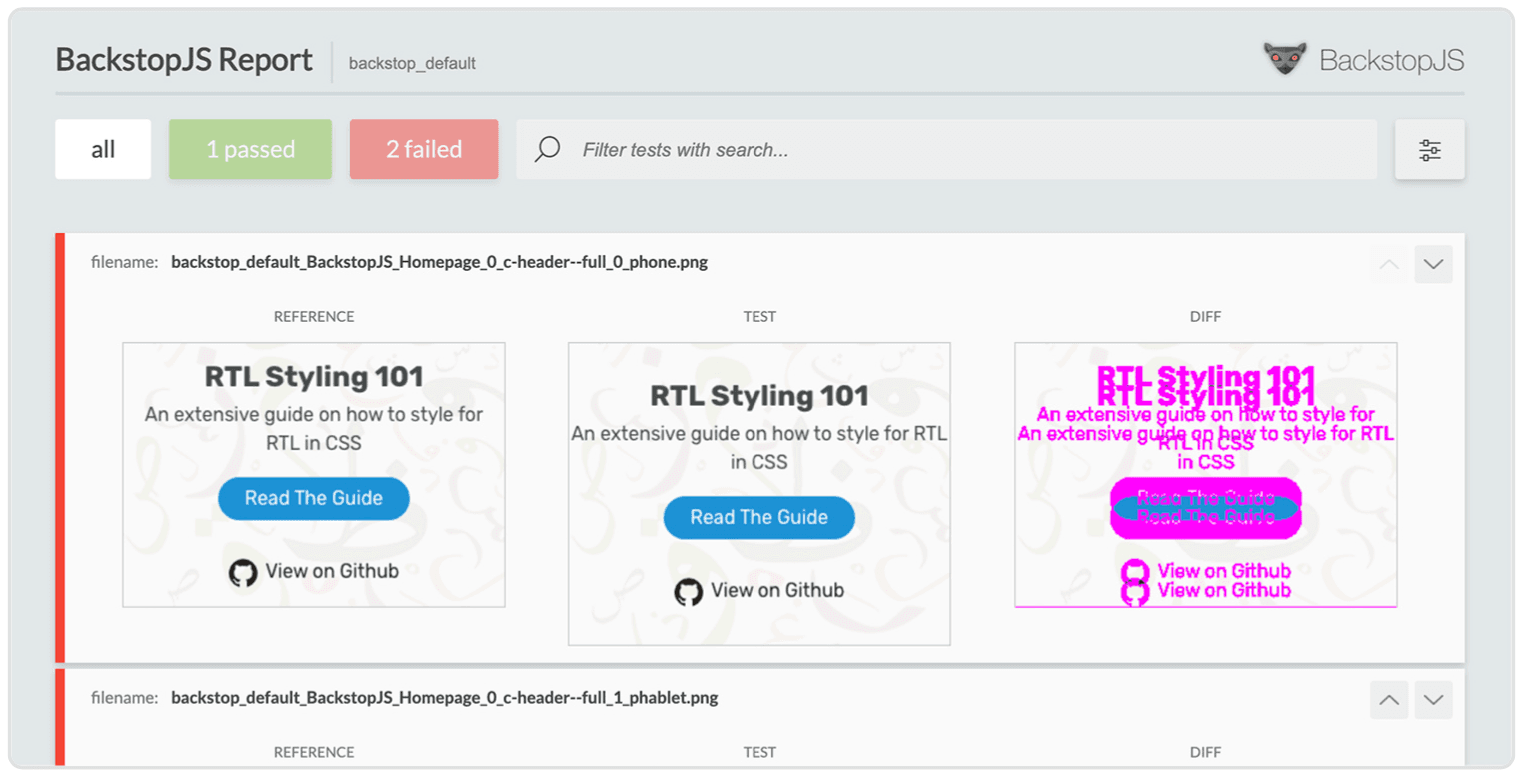
The test failed because the reference screenshot is different from the tested one. Notice how the third screenshot has a pink color — this is a highlight of the difference.
In a real project, we might work on a fix for an issue and, in the process, inadvertently create a regression. We can’t manually test everything in a large project, so having such tools makes our life easier, and makes us much more productive.
Wrapping Up
In this chapter, we’ve learned about CSS resets, reduced test cases, and regression testing. We’re almost done! In the next chapter, we will explore some general tips and tricks for debugging CSS.